- 养成看看源码的习惯
- api 文档
# 异常类
# 为什么要有异常?
- 如果没有异常,程序运行出错了不好找
- 声明异常,形成标准、规范
- 提供处理异常的操作,减少运行时预计到的 bug
# 层次结构
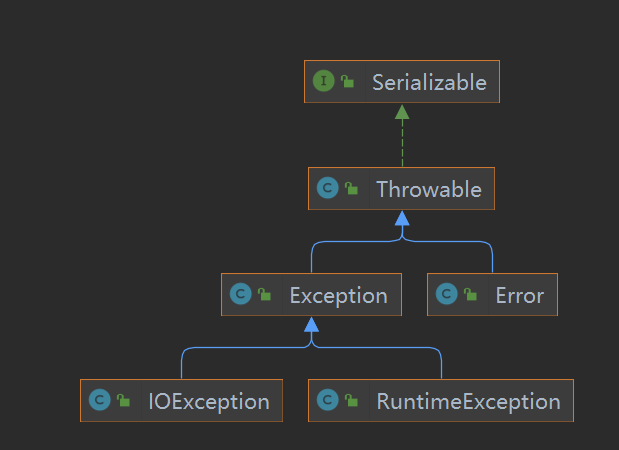
IOExxception 代指一类编译时异常
# Throwable
Throwable类是所有异常和错误的父类Throwable包含了其线程创建时线程执行堆栈的快照,它提供了 printStackTrace () 等接口用于获取堆栈跟踪数据等信息。
# Error(错误)
Error是 Throwable 的一个子类,它指示一个合理的应用程序不应该尝试捕获的严重问题。大多数这样的错误是异常情况。Error一般是 JVM 在运行时发生的Error是程序员无法进行处理的,非代码性错误
# Exception(异常)
- 运行时异常
- 非运行时异常(编译时异常)
# 可查的异常(checked exceptions)和不可查的异常(unchecked exceptions)
- 可查异常(编译器要求必须处置的异常):指编译器查,不处理不能通过编译
- 不可查异常 (编译器不要求强制处置的异常):运行时异常与错误
# 关键字
try– 用于监听。将要被监听的代码 (可能抛出异常的代码) 放在 try 语句块之内,当 try 语句块内发生异常时,异常就被抛出。catch– 用于捕获异常。catch 用来捕获 try 语句块中发生的异常。finally– finally 语句块总是会被执行。它主要用于回收在 try 块里打开的物力资源 (如数据库连接、网络连接和磁盘文件)。只有 finally 块,执行完成之后,才会回来执行 try 或者 catch 块中的 return 或者 throw 语句,如果 finally 中使用了 return 或者 throw 等终止方法的语句,则就不会跳回执行,直接停止。throw– 用于抛出异常。- 行为throws– 用在方法签名中,用于声明该方法可能抛出的异常。
finally 遇见如下情况不会执行
- 在前面的代码中用了 System.exit () 退出程序。
- finally 语句块中发生了异常。
- 程序所在的线程死亡。
- 关闭 CPU。
# 自定义异常
继承 Exception 类,拥有两个构造方法即可:
1 | public class MyException extends Exception{ |
《阿里手册》中:【强制】Java 类库中定义的可以通过预检查方式规避的 RuntimeException 异常不应该通过 catch 的方式来处理,比如:NullPointerException,IndexOutOfBoundsException 等等。
创建、抛出和捕获异常的开销是很昂贵的。
# 常用类
# String 类
字符串使用 Unicode 编码,一个字符占两个字节
# String 类的实现与继承
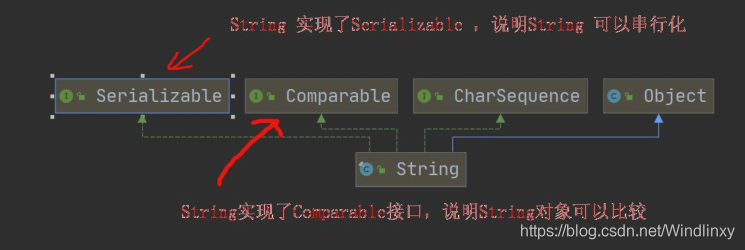 串行化 ---> 网络传输
字符串本质还是 char 数组
String 有属性:
private final char value [ ]; // 用于存放字符串内容
其中 -->value 是一个 final 类型,不可修改(指地址),value 不能指向新地址。
# String 的创建
方式一:String s1 = "hsp";
s1 指向常量池 “hsp”(没有就创建)。
方式二:String s2 = new String ("hsp");
在堆区开辟一块内存 String 类,堆区里有一个 value(存地址)寻找常量池,有就指向常量池的 “hsp”,没有就创建。
两种方式中方式一没有开辟堆区内存,方式二开辟了堆区内存,结构都指向常量池
s1 指向堆,s1.intern () 指向常量池
String str1 = "new String";
str1 = "haha";
// 创建了两个对象
String str2 = "hello" + "233";
// 创建一个对象(底层优化等价 String str2 = “hello233”)
String a = "hello";
String b = "233";
String s = a + b;
// 第一步:使用 StringBuilder sb = StringBuilder
// 第二步: 执行 sb.append ("hello")
// 第三步:执行 sb.append(“233”)
// 第四步 :String s = s.toString ()
常量相加指向池,变量相加指向堆
# String 类的常用方法
1 | - charAt(int index) |
# StringBuffer 类
String类保存字符串常量,里面的值不能更改,没次String类更新实际上是,更新地址效率较低
StringBuffer类保存字符串变量,里面的值可以更改,每次StringBuffer的更新实际上可以更新内容,不用每次更新地址,效率高;char[ ] value指向堆
# StringBuffer 常用方法
1 | - append(char[] str) |
# StringBuilder 类
(单线程安全)
- StringBuilder 的直接父类 是 AbstractStringBuilder
- StringBuilder 实现了 Serializable, 即 StringBuffer 的对象可以串行化
- StringBuilder 是一个 final 类,不能被继承
# 三个类的区别
- StringBuffer 和 StringBuilder 非常类似,均代表可变的字符序列,而且方法也一样
- String:不可变字符序列、效率低、但是复用率高。
- StringBuffer:可变字符序列、效率较高(增删)、线程安全、看源码(synchronized)
- StringBuilder:可变字符序列、效率最高、线程不安全
# 使用原则
- 如果字符串存在大量的修改操作,一般使用 StringBuffer 或 StringBuilder
- 如果字符串存在大量的修改操作,并在单线程的情况,使用 Stringbuilder
- 如果字符串存在大量的修改操作,并在多线程的情况,使用 Stringbuffer
- 如果我们字符串很少修改,被多个对象引用,使用 String,比如配置信息
# 容器框架
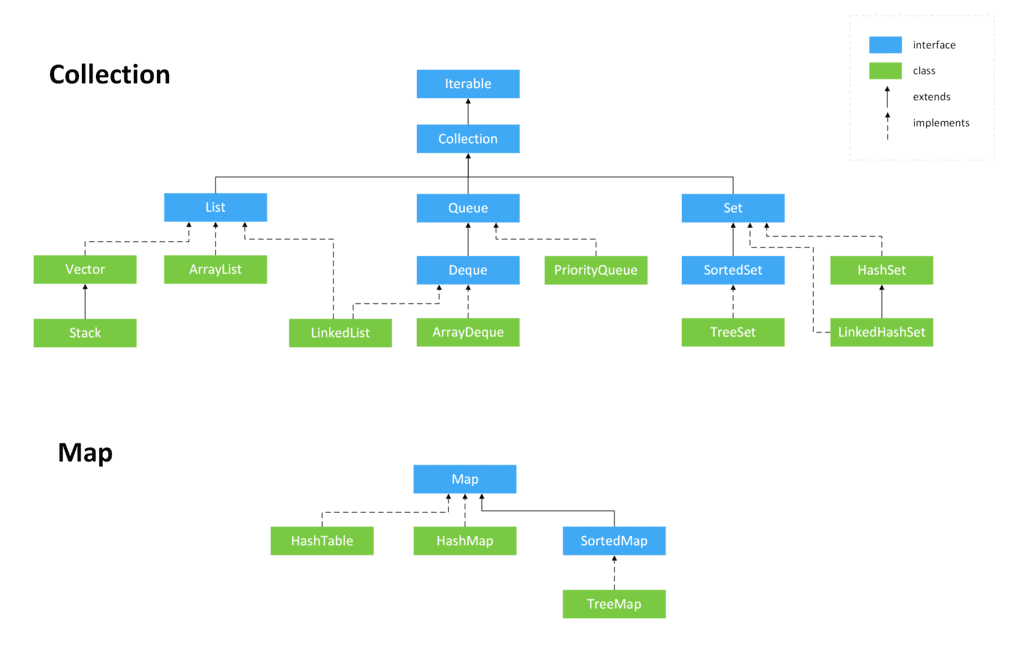
容器的目的就是用来存储数据,数组也是一个容器。
# Collection
collection 称为容器或者集合
collection 下面:
Set:无顺序,不可重复(equals-->false)
1 | Set set = new HashSet(); |
上面代码运行只输出一个 1 且 1 和 2 的顺序随机
List:有顺序,可重复(equals-->true)
对于 List 分为 LinkedList 和 ArrayList:
LinkedList 使用链表的方式进行过存储(不连续成块的内存)
ArrayList 使用数组的形式进行存储(连续的内存)
![在这里插入图片描述]() 使用 Collection 时往往是父类引用指向子类对象(上转型)
使用 Collection 时往往是父类引用指向子类对象(上转型)
1 | Collection col = new ArrayList(); |
这种容器使用方式具有安全性,所 new 的对象只能使用 Collection 的抽象方法的实现
容器类对象在调用 remove 和 contains 等方法时需要比较对象是否相等,这会涉及到对象类型的 equals 方法和 hashCode 方法;
对于自定义的类型,需要重写 equals 和 hashCode 以实现自定义的对象相等规则。
注意:相等的对象应该具有相等的 hashCode
数据结构选择:
- Array 读快改慢
- Linked 改快读慢
- Hash 两者之间(Hashtable 和 Vector 内容锁定、效率低、过时啦)
# Iterator 迭代器
- 所有实现了 Collection 接口的容器类都有一个 iterator 方法以返回一个实现了 Iterator 接口的对象。
- Iterator 对象称作迭代器,用以方便的实现对容器内元素的遍历操作。
- Iterator 接口定义了如下方法:
-- boolean hasNext ();------- 判断游标是否有元素
-- Object next ();--------------- 返回右标元素并将右标移到下一个位置
-- void remove ();-------------- 删除游标的左端的元素执行完 next 之后该操作只进行一次
Iterator 对象的 remove () 方法是迭代过程中删除元素的唯一的安全方法
使用 Iterator 遍历:
1 | Iterator<Student> it = list.iterator(); |
# List
常用的两个类 ArrayList 和 LinkedList
ArrayList 使用连续内存存储;
LinkedList 使用链表形式存储;
# Map
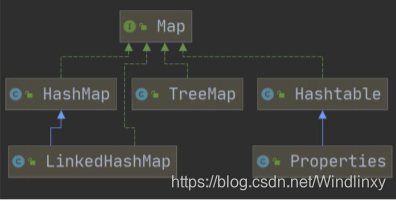
# 泛型
Java 泛型设计原则:只要在编译时期没有出现警告,那么运行时期就不会出现 ClassCastException 异常.
泛型:把类型明确的工作推迟到创建对象或调用方法的时候才去明确的特殊的类型
# 使用泛型目的
使用泛型一方面使代码更加简洁高效,另一方面避免了下转型强转的安全问题(不使用泛型的话,读取时就需要对集合中的数据进行强转)
使用泛型在编写集合时声明了类型,增强代码可读性和稳定性。
# 关于 for 与泛型
使用泛型后,联系 java 的增强 for 循环,可以使用 for(<E>:collection)来遍历读取集合中数据,更加方便,但注意:只能读取不能改写(这是 for 增强语句的特点,局限性强)
# 泛型类与泛型方法
泛型类形如 class Object<T> 的声明
看个例子:
1 | class ObjectExample<T> { |
这样我们可以声明对象,可以使用 <> 规定这个对象的类型,很方便。
当我们使用类时可能仅仅需要一个用泛型的方法,不需要整个类是泛型类
1 | public T show(T t){ |
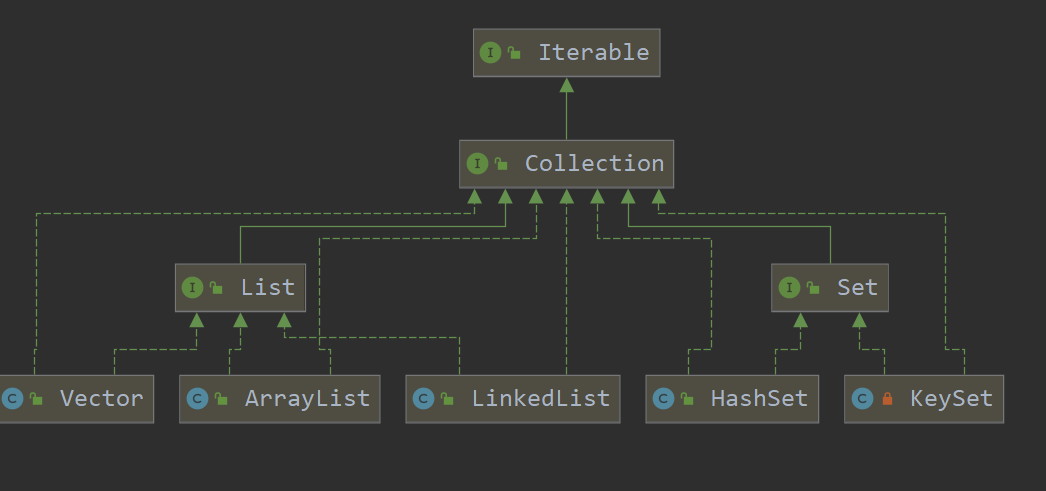 使用 Collection 时往往是父类引用指向子类对象(上转型)